Data Parameterization in TestNG

Parameterization using TestNG plays a crucial role while creating the framework and automation scripts.It assists in running multiple iteration with different set of data.

For example, we can achieve Parallel execution using TestNG, in that case browsers are passed as the parameters.

There are two ways to parameterize in TestNG:

1.Using Parameters Annotation and TestNG XML

Scenario 1:-
Fill the username and Password values using Parameters approach

Solution:-
We need to work with TestNG.xml file and the @parameter Annotation.

TestNG.XML:-
In XML file we will create parameters as name/value pairs and using its tag.

Our xml file will look like this :-


<!DOCTYPE suite SYSTEM "http://testng.org/testng-1.0.dtd" >
<suite name="Suite">
 <test name="uftHelp">
  <parameter name="userName1" value="Test1"></parameter>
  <parameter name="pwd1" value="Pwd1"></parameter>
  <classes>
   <class name="srcTest.DataParameterization"/>
  </classes>
 </test>
</suite>


Parameter annotation:-
We will map our XML file parameters with our main code, so that we can utilize its values, it is done using @parameter annotations.

Our parameters code will look like this:-

@Parameters ({“userName1", “pwd1" })

Code:-

package srcTest;
import java.util.concurrent.TimeUnit;
import org.openqa.selenium.By;
import org.openqa.selenium.WebDriver;
import org.openqa.selenium.firefox.FirefoxDriver;
import org.testng.annotations.Parameters;
import org.testng.annotations.Test;


public class DataParameterization {
 private static WebDriver driver;
 //Declaring the Parameters to receive values from TestNG.xml
 @Test
 @Parameters({"sUserName","sPwd"})
 public void login(String sUserName,String sPwd)
 {
  driver = new FirefoxDriver();
  //Adding Implicit wait 
  driver.manage().timeouts().implicitlyWait(20, TimeUnit.SECONDS);
  //Maximize browser
  driver.manage().window().maximize();
  //Open the Login Application
  driver.get("http://www.ufthelp.com/p/testpage.html");
  //Fill the UserName and Password fields
  driver.findElement(By.id("userName")).sendKeys(sUserName);
  driver.findElement(By.id("password")).sendKeys(sPwd);
  //Click the Sign in Button
  driver.findElement(By.id("SignIn")).click();
  //Clicking on the alert message
  driver.switchTo().alert().accept();
  //Destroying the object
  driver.quit();
 }
} 
Scenario 2:-
We would utilize the above approach to implement the running of same test case on various browsers (say Firefox, chrome)
Note:-
  • @Parameter is applied On any method that already has a @Test, @Before/After or @Factory annotation, it can be applied atmost on one constructor of the test class.
  • Incase @Parameters do not have a corresponding value in testing.xml.We can set @optional annotation value in the code.
  • Remember @parameters can be placed in suite level and test level in our .xml file. But  If same parameter name is declared in both places, test level parameter will get preference over suit level parameter.
  • We cannot have duplicate name value pairs in the TestNG.XML file, every parameter name should be unique.Thus to test multiple set of data for the same name, we need to implement DataProviders.
  • XML parameters should be mapped to the Java parameters in the code in the same order as they are found in the annotation, else TestNG will generate an mismatch error
2.Using Dataprovider Annotation

A Data Provider is used in case we need to pass complex parameters in the Test method.  A Data Provider is simply a method annotated with @DataProvider; here, the Data Provider itself acts as a data source. An array of objects with parameters can also be drawn from an Excel, CSV, or Database file using third-party APIs such as JXL or Apache POI.

Approach:-
The @DataProvider method supplies the parameters to the @Test method. In order to receive the data from the @dataProvider method, the name of the Data Provider must match on both annotations.
Example:-
@DataProvider(name = “TestMe”)
@Test (dataProvider =”TestME”)

Note:-
Data Provider is a unique feature in TestNG; it is not available in JUnit. Many prefer TestNG because of its effective parameterization results.


Introduction to TestNG in Selenium

In our last tutorials we covered the basic aspects of Selenium. Now we are moving towards intermediate phase so that we can inculcate framework level things in Selenium execution.

Today we are focusing on Test NG framework; we will touch its key components which will mentor us to use its capabilities with Selenium.
Our Philosophy "The best way to increase happiness is to share it with Others, And the best way to increase learning is to share with others".

Do share our learning by liking our Facebook Page,Google+,LinkedIn or Twitter.

What is TestNG?
TestNG(Next Generation) is an open source testing framework written in Java and inspired from JUnit and NUnit, it is not only inherited existing functionality from Junit as well as introducing some new innovative functionality that make it powerful, easy to use, reliable, maintainable and testable codes. 

TestNG is emerging as a Testing platform, which is designed to cover all categories of tests: unit, functional, end-to-end, integration, etc. we can take full advantage of TestNG from engineering to quality insurance.

Creator: -
Cedric Beust founder of TestNG
Cedric Beust @Cheers for TestNG

TestNG was created by Cedric Beust.
To get more enlighten about him:- listen to Cedric Beust interview.

Why to Use TestNG in Selenium?
1. It provides reporting mechanism which was missing in Selenium.
2. Annotation provides better control on the flow of the Execution. Like setting priority for test to Run.
3. Uncaught exceptions are handled, rather than stopping the execution and failures are reported in the results.
4. We can run failed test case by simply using testng.xml no need to run full test suite in case of failure

Key feature list of TestNG:-

  • Annotations.
  • HTML reports of Execution.
  • Logs
  • Support for parameters
  • Support for multi-threaded testing
  • Data Provider (Data driven Testing)
  • Supported by a variety of tools and plug-ins (Eclipse, Maven, etc...).
  • Listeners

Annotations:-
In laymen terms it is a comment attached to a particular section of a code.
Now when compiler interprets this comment it controls the flow of execution. 

So we can say Annotations in TestNG are lines of code that can control the flow of execution of an attached method, class, field and other program elements.

Syntax:-
@Name 

Example:-
@BeforeTest.

Some important annotations:-
Annotation
Meaning
@BeforeSuite
This annotation method will execute before all tests in this suite, example
Creating the WebDriver Instance
@AfterSuite
This annotation method will execute after all tests in this suite, example
Destroying the WebDriver object
@BeforeTest
This annotation method will execute before any test method belonging to the classes inside the Test tag is executed
@AfterTest
This annotation method will execute after all the test methods belonging to the classes inside the Test tag have executed.
@BeforeClass
This annotation method will execute before the first test method in the current class is invoked
@AfterClass
This annotation method will execute after all the test methods in the current class have been executed.
@BeforeMethod
This annotation method will execute before each test method.
@AfterMethod
The annotated method will be executed after each test method.
@Parameters
It Describes how to pass parameters to a @Test method.
@Listeners
Used in defining listeners on a test class.
@DataProvider
This method is used in supplying data for a test method

Benefits:-
1) TestNG identifies the methods it is interested in by looking up annotations,we don't need to add Static or Main method in our code. Hence method names are not restricted to any pattern or format.
2) We can pass additional parameters to annotations, like @Test (priority=1)
3) Annotations are strongly typed, making compiler to show the failures.


Data Parameterization
Running the same test with different set of Data. For example, login to the same application but with multifarious user credentials.

How to achieve it?
1.Using Parameter Annotation and TestNG xml file.
Example: - @Parameters ("UserName") and defining the value of UserName in .xml file.
2. Using DataProvider Annotation
Example: - @DataProvider (name = "UserName")
Listeners
TestNG listeners is like an interfaces that allows extending of TestNG behaviour. It provides a way to call event handlers inside custom listener classes, and makes it possible to do certain operations in the TestNG execution cycle.
TestNG defines a @Listeners annotation that is analogous to the listener’s element in the test suite configuration xml file.

When running TestNG tests, one could want to perform some common actions – after each test has finished successfully, after each failed test, after each skipped test, or after all the tests have finished running, no matter their result. To apply such a common behaviour to a group of tests, a custom listener can be created, that implements TestNG’s ITestListener interface.


Log4j Configuration file

After executing our basic test case using logger in log4j, we would modify it, to include "Appender" and "layout" objects by implementing "Configuration file" in our code.

What is Configuration file?
Configuration files are used to configure settings of log4j file. This can bewritten in XML or in Java properties (key=value) format.


Example:-
Using Basic configuration file in the code, which is used to create simple log4j setup.
Syntax
BasicConfigurator.configure();


If we run the same code that we used on our first test case and add BasicConfigurator it would look like this:-

package Log4j_Learning;
import org.apache.log4j.Appender;
import org.apache.log4j.BasicConfigurator;
import org.apache.log4j.ConsoleAppender;
import org.apache.log4j.Layout;
import org.apache.log4j.Level;
import org.apache.log4j.Logger;
import org.apache.log4j.SimpleLayout;
public class Log4j_FirstTestCase {
//Creating the logger object
static Logger log = Logger.getLogger(Log4j_FirstTestCase.class);
public static void main(String[] args) {
//log.setAdditivity(false);
BasicConfigurator.configure();
//Setting the log level
log.setLevel(Level.WARN);
//Creating the layout object
Layout sLayout = new SimpleLayout();
//Creating the Appender object
Appender app = new ConsoleAppender(sLayout);
//Adding appender to logger
log.addAppender(app);
log.debug("First debug Message");
log.info("First info Message");
log.warn("First Warning Message");
log.error("First Error Message");
log.fatal("First Fatal Message");
}
}

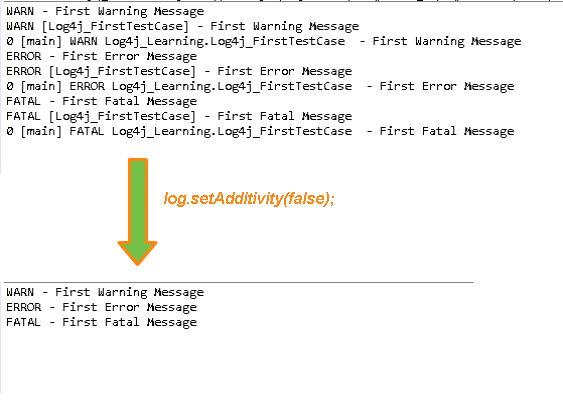
Output which varies with log.setadditivity(false) is applied:-

setadditivity to avoid repetitive logs in log4j
log4j, logs with/without setAdditivity

Note:-We are having double results in the console,it's because appenders are not singletons, they are additive.Meaning, A category inherits all the appenders from its ancestors (by default). If we add an appender to a category and it writes to the same underlying stream (console, same file etc.) as some other appender, the same log message will appear twice (or more) in the log. In addition, if two categories in a hierarchy are configured to use the same appender name, Log4j will write twice to that appender.


To avoid such situation we need to Use log.setAdditivity(false) on a category to disable inheriting of appenders. Then, log messages will only be sent to the appenders specifically configured for that category.


Files Required:-
log4j_Selenium.Java [Test Case with logs]
log4j.xml [xml Configuration file, we can use properties file also]
log4j_logfile.txt[File for writing logs]
log4j example file structure
Project Structure for log4j test case.


Java Code:-
package Log4j_Learning; 
import org.apache.log4j.Logger;
import org.apache.log4j.xml.DOMConfigurator;
import org.openqa.selenium.WebDriver;
import org.openqa.selenium.firefox.FirefoxDriver;
public class log4j_Selenium {
//Creating the logger object
static Logger log = Logger.getLogger(log4j_Selenium.class);
public static void main(String[] args)
{
DOMConfigurator.configure("log4j.xml");
log.info("**************Begining of Logs******************");
//Creating WebDriver Object
log.info("Launching the Browser");
WebDriver driver = new FirefoxDriver();
//Opens the given URL
driver.get("http://www.uftHelp.com");
log.info("Fetching the Title");
//Returns the Title of Current Page
String sTitle = driver.getTitle();
log.info("My First Selenium Program using Log4j");
log.info("Title is = '"+sTitle+"'" );
//Closing the Browser
driver.close();
log.info("Browser closed");
System.out.println("Logs Created Successfully");
log.info("**************Ending of Logs*********************");
}
}


XML file:-
<?xml version="1.0" encoding="UTF-8" ?>
<!DOCTYPE log4j:configuration SYSTEM "log4j.dtd">
<log4j:configuration xmlns:log4j="http://jakarta.apache.org/log4j/" debug="false">
<!-- Creating the File Appender -->
<appender name="fileAppender" class="org.apache.log4j.FileAppender">
<!-- File to write logs -->
<param name="File" value="log4j_logfile.log"/>
<!-- Layout = "PatternLyaout" -->
<layout class="org.apache.log4j.PatternLayout">
<!-- Printing message with date , time & class name -->
<param name="ConversionPattern" value="%d{dd MMM yyyy HH:mm:ss} %5p %c{1} - %m%n" />
</layout>
</appender>
<root>
<level value="INFO"/>
<appender-ref ref="fileAppender"/>
</root>
</log4j:configuration>


Output:-
Open the log4j_logfile,which will be created in the project folder.
Output of log4j in text file

Explanation:-
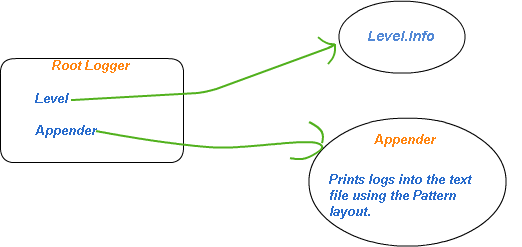
We used the root logger to create a "Info" level message and used the "File Appender" to paste the results into the external text file(log4j_logfile).Furthermore we have used layout as "Pattern Layout" to create a pattern of message in the form of "%d{dd MMM yyyy HH:mm:ss} %5p %c{1} - %m%n", which means date time + log level + message.
log4j structure
Configuration file structure


Note:- Incase we want results to be shown in the "Console" of the IDE(Eclipse), we can use "Console Appender" in our Configuration file(log4j.xml).
Just change the configuration file for the above java code and check the output in the console and same external file.


Configuration file with Console+file Appenders:-
<?xml version="1.0" encoding="UTF-8" ?>
<!DOCTYPE log4j:configuration SYSTEM "log4j.dtd">
<log4j:configuration xmlns:log4j="http://jakarta.apache.org/log4j/" debug="false">
<!-- Creating the Console Appender -->
<appender name="consoleAppender" class="org.apache.log4j.ConsoleAppender">
<layout class="org.apache.log4j.PatternLayout">
<!-- Printing message with date , time & class name -->
<param name="ConversionPattern" value="%d{dd MMM yyyy HH:mm:ss} %5p %c{1} - %m%n"/>
</layout>
</appender>
<!-- Creating the File Appender -->
<appender name="fileAppender" class="org.apache.log4j.FileAppender">
<!-- File to write logs -->
<param name="File" value="log4j_logfile.log"/>
<!-- Layout = "PatternLyaout" -->
<layout class="org.apache.log4j.PatternLayout">
<!-- Printing message with date , time & class name -->
<param name="ConversionPattern" value="%d{dd MMM yyyy HH:mm:ss} %5p %c{1} - %m%n" />
</layout>
</appender>
<root>
<level value="INFO"/>
<appender-ref ref="fileAppender"/>
<appender-ref ref="consoleAppender"/>
</root>
</log4j:configuration>

Install Log4j in Eclipse

We are done with basic introduction to log4j, now lets make our setup ready to work with log4j in selenium.

Download  Log4j:-
Step1:-
Open the link http://logging.apache.org/log4j/1.2/download.html

Step2:-
Click on the below link 
download apache log4j
log4j zip file link
Step3:-
Click on the Apache Download Mirrors link
log4j downloading link
log4j download link
Step4:-
Save and Extract the file
log4j download from apache
Downloading the log4j jar file
log4j jar file
log4j jar file after extraction

Step5:-
Include the Jar file in project and we are done
How to add Jar to project.
add log4j to eclipse
Adding log4j jar files to Java project

Log4j introduction in Selenium

What is Log4j?
Log4j is a Java library,which is used in logging.  Log4j came into existence in 1996, as an initiative by SEMPER group to create a tracing API. Log4j is an open source tool and licensed under Apache Software License.


introduction log4j
log4j

At its most basic level, we can imagine this as a replacement for System.out.println(sysout) statement in our code.But it is far more superior than sysout,but how? Let’s elaborate on this.


Why Log4j?

Lets discuss some advantages of log4j:-


  • The output from Log4j can go to the console, to an email server, a database table, a log file, or numerous other destination, unlike sysout which outputs to standard output, which typically is a console window.
  • It allows different levels of logging like TRACE, DEBUG, INFO, WARN, ERROR, and FATAL. Say if we set a  particular log level, messages will get logged for that level and all levels above it, For instance, for log level = Error, we will have log messages that are errors and fatal and if we have log level = Info, we will have log messages that are info, warn, error, and fatal.
  • Log4j provides the feature to define the format of output logs. Furthermore we can configure Log4j via a configuration file, making it easy to control the logging behavior by editing this file, without touching the application binary.


Main components of Log4j:-


  1. Logger 
  2. Appender 
  3. Layout
LOGGER:
Logger is responsible for handling the majority of log operations.This object of logger class is responsible for capturing logging information and Control over which logging statements are enabled or disabled.

APPENDER:

Appender is responsible for controlling the output of log operations.This Appender object is responsible for publishing logging information to various preferred destinations such as a database, file, console, etc.

Some example of appender:-


appender log4j
Appenders in log4j


LAYOUT:
Layout is responsible for formatting the output for Appender.
Layout objects play an important role in publishing logging information in a way that is human-readable and reusable. The most popular layouts are the PatternLayout and HTMLLayout.


Don't worry will have working codes with more explanation about them.

Follow the below readings to learn more because "the best is yet to come...":-
Downloading log4j 

First test case using Log4j
Using Configuration file in log4j


Functional Testing By Selenium

Selenium is a Functional Testing Tool. It's support Java, C#, PHP, Python, Ruby, Perl & more languages. But Java is widely used.

I will try to cover Selenium with Java.

01)   Selenium IDE
02)  Selenium RC
03)  Selenium WebDriver

Selenium IDE is a Firefox Addin. It's support record & Play back.

Selenium RC is known as Selenium 1.
Selenium WebDriver knows as Selenium 2.

TestNG Annotations

TestNG Annotations are as follows:

@Test
@BeforeTest@AfterTest,
@BeforeMethod@AfterMethod,
@BeforeClass, @AfterClass,
@BeforeSuite, @AfterSuite,  
@BeforeGroups, @AfterGroups.

Mouseover in Selenium Webdriver

How to handle Mouseover in Selenium Webdriver:

There are many application you will find that when you mouseover then dropdown expand or it's perform an action. You don't need any click or right click of that element.
In that situation how you will handle in Selenium Webdriver? If you find that element ID or xpath or any other locator and click on that element but it will not work for Selenium Webdriver.
You have to use Action Class to perform this type of action otherwise it will not work. Please see the following image for code.

How to handle Hidden Element in Selenium webdriver:


If you find any element type is 'Hidden' and you try to click that element by regular click then it will not work in Selenium Webdriver. To handle hidden element you should use Javascriptexecutor. With the help of javascriptexecutor you will be able to overcome this situation. Please see the following image for code.
Mouseover and Hidden element in Selenium webdriver